FitNesse technical setup
📅 Published: • Thomas Queste
Getting FitNesse working for a development team is not particularly clear. You have many possibilities and some of them are not so effective.
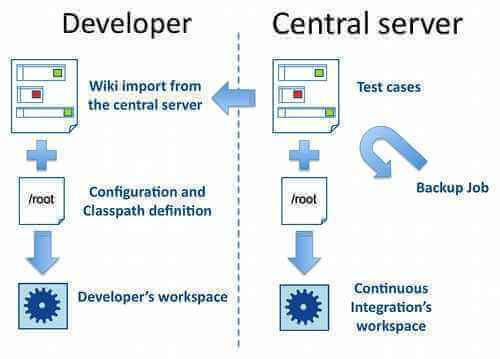
The Setup proposed here has a good combination of pros and cons. It will enable the work of two teams: one team of functional people using a central server and one team of developers writing the fixture straight from their workspace.
Advantages and disadvantages
Pros:
- Developer friendly
- One unique source of test cases: the central server
- Test pages backup along the source code
Cons:
- Pages cannot be created locally; they have to be created on the central server
- The backup task seems hacky, but it does the job
Team process
The functional people use the central server to manage the test pages
Each developer has its own FitNesse server, which imports the page from the central server and uses the local workspace
A job adds, delete and commits the changes made on the central server’s pages
Basic rules:
- Pages must be created on the central server, never locally
- Pages must be modified remotely (using the “Edit Remotely” button); Local pages may be erased at the next sync, so use them carefully

Setup
1. Central Server
Launcher
The launcher will use a local checkout of the project. This checkout is used for compiling the fixture and project code, and also to be able to commit the changes made to the test pages.
Launcher command line:
java -jar fitnesse.jar -p 8086 -e 0 -r $dir_with_fitnesse_pages
The “-e 0” argument disables the built-in versioning system of FitNesse.
The “-r $dir” argument tells FitNesse to use this directory as the repository of pages.
The whole command line arguments are described here: http://fitnesse.org/FitNesse.UserGuide.CommandLineArguments
Classpath
We use the “root” page (http://localhost:8086/root) to declare the server’s configuration and classpath.
This page won’t be added to source control because its content will be different on a developer’s workstation.
The fitnesse-maven-plugin is used to create the list of jars we depend on. It reads the pom.xml file of our maven project, but it can also read a pom file directly from the central repository.
Content of the root page:
Use Slim engine instead of Fit
!define TEST_SYSTEM {slim}

Change the default port to avoid conflicts
!define SLIM_PORT {62123}

Classpath and pom file
!path /home/hudson/workspace/myproject/fitnesse/target/test-classes
!pomFile /home/hudson/workspace/myproject/fitnesse/pom.xml
Backup job
The backup job is straightforward. It is run by our Build server every minute and launches a basic script, which adds, deletes and commits all changes within a directory.
Here is a simple batch file for Subversion. The first argument should be the directory to backup.
for /f "tokens=2*" %%i in ('svn status %1 ^| find "?"') do svn add "%%i"
for /f "tokens=2*" %%i in ('svn status %1 ^| find "!"') do svn delete "%%i"
svn commit -m "Automatic commit" %1
We did try to use a FitNesse plugin for Subversion to backup the pages automatically (and in a less hacky way), but that simply did not work at all. This plugin was: http://code.google.com/p/cm-subversion
FitNesse has also a pseudo-native support for Git (see here), but corporate Git repositories are still not the standard.
SVN ignore
All files in the working directory of FitNesse can be versioned, except:
- The “root” page we used earlier, this is the content.txt and properties.xml at the root of the working directory
- The “ErrorLogs” directory
- All zip files “*.zip” (there should be none because of the “-e 0” flag
Source: http://stackoverflow.com/questions/249580/how-do-i-add-fitnesse-pages-to-version-control
2. Developer server
Launcher
On a developer server, we don’t need the “-r” flag. The pages will be imported from the central server.
Launcher command line:
java -jar fitnesse.jar -p 8086 -e 0
Classpath
As on the central server, the “root” page is used to configure the classpath.
The content is the same, except the local path:
Use Slim engine instead of Fit
!define TEST_SYSTEM {slim}

Change the default port to avoid conflicts
!define SLIM_PORT {62123}

Classpath and pom file
!path /home/tom/dev/myproject/fitnesse/target/test-classes
!pomFile /home/tom/dev/myproject/fitnesse/pom.xml
Wiki import
The Wiki Import feature is used to, well… import the pages from the central server.
How-to:
- From the developer’s server, create a new page
- From the properties, paste the URL to the parent page you wish to import (something like http://fitnesse:8086/MyProject)

Debugging
Debugging is straightforward. Add a breakpoint to a fixture then create a “Remote Debug” configuration (within the Debug menu).
Under FitNesse, append the following at the end of the page you want to debug:
?responder=test&remote_debug=true
Random problem (Bind, Socket exception)

If you experience strange errors with no output, or better Socket and Bind exceptions (like in the screenshot), you should use the SLIM_PORT option (as used in this article). This basically shifts the ports used by Slim to avoid conflicts with, let’s say, Tomcat.
Add this:
!define SLIM_PORT {62123}
